Become a Champion

Already an established user in FunctionFox? Dive into some advanced tools and features.

home Help Center keyboard_arrow_right Become a Champion Series keyboard_arrow_rightRequest Forms

Request Forms

Available with the FunctionFox In-House platform, Request Forms allow external users to request new projects within FunctionFox. You can create multiple forms for different departments, project types, etc. Once filled out and submitted by the requester a new project will automatically be created in your account and email notifications sent.

Personnel can sign up for email notifications when a new project is submitted through the request form under My Preferences > Alerts

Creating a Request Form:

  1. Go to Projects > Request Forms.
  2. Enter in a request form Name.
    FunctionFox product image entering in request form name
  3. Select a Request Form Owner the confirmation email sent to the requester will be generated from this person’s email address.
    FunctionFox product image selecting request form owner
  4. Enter a Form Title which will appear in the header on the request form.
    FunctionFox product image entering in form title
  5. Enter a Form message that will appear on the request form (max 2000 characters), this is a great place to include instructions or links for the requester.
    FunctionFox product image entering in form message
  6. Choose to send a Confirmation Email. With this option checked, the system will automatically send a confirmation email to the requester with the details of their request as well as the custom text entered into the Email Message.
    FunctionFox product image entering in form email confirmation message
  7. Check off the "Don’t Apply Tasks" setting if you DO NOT want your Common Tasks automatically applied to projects requested through this form.

    Note: You will need to manually add tasks or apply a project template in order to track time.

  8. Choose to have you form only show as a single column, not having it split the available fields evenly.
  9. Choose set a specified splitting point for you form.
  10. Set the minimum days until a project start date can be chosen/set in for the requested project.
  11. Select the Fields you wish to show on the request form:
    FunctionFox product image selecting fields to show on form
    • Mandatory Fields included for all request forms are: Requester Name, Requester Email, and Project Name

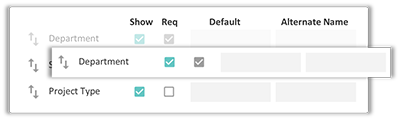
      The Department field is required, but can be hidden on the form (if choosing to hide the field you must select a default department).

      FunctionFox product image department form field default option

      You can also make any field required by the requester by checking the "Req" checkbox.

    • Optional standard fields include: Phone number, project code, project type, scope, project manager, start and due dates.
    • Custom Fields can also be included on your form to capture Project information unique to your account. To add/edit available custom fields go to Account Preferences > Custom Fields.
    • Set a Default option for any field, this will pre-populate the form fields with that value.
    • Enter an Alternate Name for a field on your form.

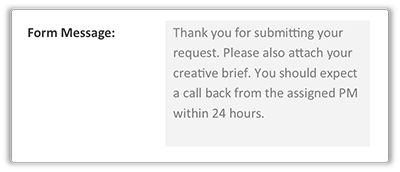
      Note: This will not change the field name within your account, only the form title visible to the requester

  12. Customize the order of the fields in the form by dragging and dropping the field to your desired location.
    FunctionFox product image change field order for display
  13. Click Save New

Additional Form Customization

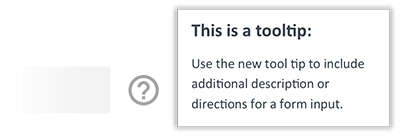
Tool Tip: Create a tool tip for any form input field. You can use this to help provide additional information or instructions for the field

  1. To create a tool tip, click on the tool tip icon help_outline next to any form field.
  2. Enter your text in the tool tip modal.
  3. Click Save
    FunctionFox product image adding in a form field tool tip

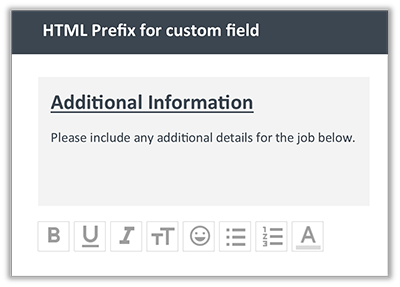
HTML Prefix: You can insert HTML/text above any form label. This is helpful when you are trying to create a form section (e.g. Additional Details) for when you are looking to provide further descriptions for the requester.

  1. To create an HTML prefix, Click on the HTML Prefix Icon note_add next to any form field.
  2. Enter your Text in the HTML prefix modal.
  3. Click Save.
    FunctionFox product image adding in addtional HTML form headers

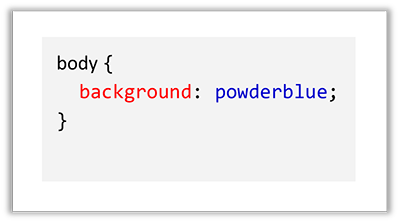
Custom Form CSS: Make custom CSS changes to your request form by utilizing the request form CSS field.

  1. Click on Tips/Links.
  2. Show CSS Field.
  3. Enter your custom CSS into the CSS input field.
  4. Click Save Edit to apply your changes to the request form.
    FunctionFox product image adding custom CSS

pets

FOX TIP: Having trouble setting up your form? Contact our customer success team for assistance.

Using the Request Form

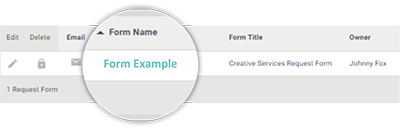
Once you have saved your first request form, you will see the request form table appear below the form.

Within this table you will be able to:

  • Access your Form: you can access/view your request form by clicking on the form name within the table.
    FunctionFox product image access form link for sharing form
  • Email your Form: You can choose to share your form to potential requesters through email by clicking on the mail icon mail.

FunctionFox product image request form client view.

pets

FOX TIP: Wanting to share your Request form through other methods? Right click on the form name and copy the link address.

Requested Projects

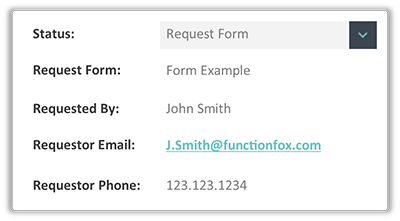
Once a project is submitted via a request form, it will appear in FunctionFox just like any project created through the Manage > Projects page. There will, however, be a few differences between projects created manually and those requested through a request form:

  • The default status of any requested project will be "Request Form".
  • When viewing the project details for requested projects, they will include fields for Requested By, Requester Email, Requester Phone and the Request Form Name.
    FunctionFox product image form details included on project info modal

Editing Your Request Form

  1. Click on the edit icon create beside the form name.
  2. Make the desired changes.
  3. Click Save Edit

Note: Changes will automatically be applied to the existing form, there is no need to update your shared links.

Archiving and Deleting Forms

You can delete any form that has no requested projects against it. To delete a form click on the delete icon delete next to the form you wish to delete.

If you cannot delete a form, you can archive the form. This will de-activate the link so no further requests can be made through the form.

To Archive a form:

  1. click on the edit icon create beside the form name.
  2. Under the Name field, check the "Archived" checkbox.
  3. Click Save Edit.

You can re-activate an archived form by following the steps above and un-checking the "Archived" checkbox.

Note: This will re-activate the original form link. If you require a new link for the form, you will need to create a new form.

Still Have Questions?

Get in Touch

FunctionFox uses cookies to deliver you the best possible web experience, analyze site traffic, and personalize content. By continuing and remaining on our site, you consent to our use of cookies. To learn more about how we use cookies please visit our Cookie Policy or Privacy Policy

Continue